
Without a doubt, one of the largest issues I see in most software projects is poor specifications (specs) and communication between the dev and product owner .
Somebody figures out a general app, and what it should do, mocks up a few key screens, and then gives them to a developer to go build. Sounds good, right?
Unfortunately, with this approach, there is a lot of ambiguity left, since the devil is in the details – and the developer is often left to guess or spend a lot of time round-tripping back and forth trying to understand what they should be doing.
I’ve said this many times to people early in a project – “For every hour you spend now thinking through the details, you’re going to save 1 to 3 DAYS of development time later”
This may seem like a stretch, but I’ve seen it time and again on projects. When things are not well though out, defined, and scoped, projects take on a life of their own.
So, how do you, as a product owner fix this problem? Well, this is a long answer, and this post will be one of several covering Developer Specs, and how to do them right. Let’s start with the final spec you give to the developer ( yep, I’m putting the cart ahead of the horse a bit, but this is also the area where I see the largest opportunity for improvement.)
In my experience, delivering Clear, Detailed yet Concise specs to your dev is much easier than most people think. Unfortunately, I see people time and again using the wrong tools to do this.
They may write out a 40-100 page Word doc describing the app in excruciating detail – this is not concise enough- devs are going to have a hard time getting through that, and wrapping their heads around everything, even if they do manage to stay awake.
On the other end of the spectrum, some product owners have beautiful mock-ups (made with Keynote, PhotoShop, Balsamiq or any of the other dozens of software prototyping and wire-framing tools out there), with every screen pixel perfect, looking exactly like they want the final product to look. While this is much easier for devs to consume than the word doc, this approach generally lacks the fidelity needed for a developer to actually build the app correctly.
Over the past few years, I’ve been refining an approach that is a good mix from several schools of thought, using a tool called Calrify-It to generate the final document. While I could probably do the same thing in Word, a paint program, or even KeyNote / PowerPoint, Calrify-It just makes things so much faster for me.
Here is my general workflow for creating developer feature specs:
- Map out the entire feature mentally, and get it on paper (this will be a future blog post)
- Create the UI mockups. For web-apps I may do this in straight HTML, or use Balsamiq to create some rough UI. If this is an existing product, I’ll just use the Clarify-It tool to make some screen shots.
- I will now lay out each discrete UI page in a page in Clarify it, and start marking it up will numbered call outs, and then detailed instructions under each call out in a numbered list
- I’ll wrap up the spec with a Context page at the beginning of the Clarify doc which provides some general details on the feature, how the customer will use it, and why we need to build it. I’m not justifying this to the developer, but it is always good that they understand the “Why” behind things. Developers, by nature, are analytical – so answering the WHY for them generally helps to connect a lot of dots, and make sure they are engaged correctly. I’ll also include any notes on this page(es) on things that are just not part of the UI that may need to be called out.
- I’ll generate a formatted PDF (Clarify It does this nicely), and share it on Dropbox for my dev team.
A picture is worth 1000(++) words, so here are a few real-world examples…
Sample 1: A ‘simple’ tweak to an existing product
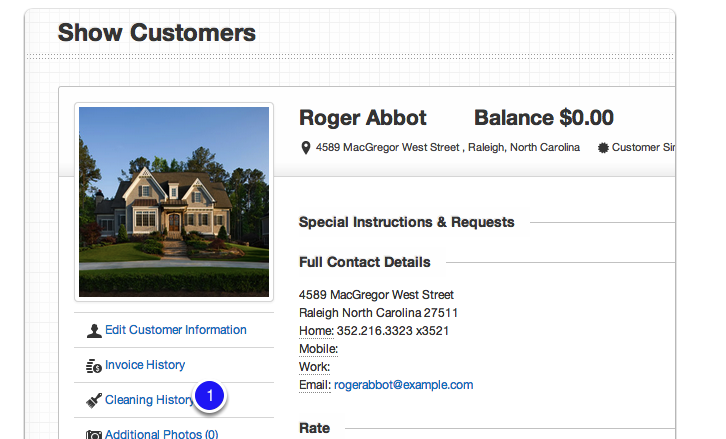
In this example, we wanted to add “Delete” an employee functionality to the product. Since we actually need to keep the customer record for historical purposes (it needs to hold past transactions for billing, reporting, payroll etc..) we really just want to hide the employee record from views and searching. This simple PDF explains this, and includes a screenshot of the live product, indicating where the delete button should be replaced in the UI. I also call out the text that should be included on the confirmation dialog – otherwise there is no telling what would have ended up there.
This is a super simple example, and it only took me 5-10 minutes to work through and create, but could have easily been 30-90 minutes or more with a developer going back and forth if I had just said “We need to delete employees”. They would have asked for where the button goes, maybe they would have left out the confirmation screen (really bad on a delete), or maybe they would have really deleted the record in the database, also really bad.
Download Example 1, Deleting an Employee (PDF)
Sample 2: A more complex example, adding a financial history feature into the product
This example is quite a bit more complex. In our system we were track multiple financial transactions (billing, invoices, payments, credits), but not reporting them in a logical way that customers (or their bookkeepers) could understand. We knew we needed to do this – but it was not part of our initial product, and we knew we could ship & sell the product without it. But after about the 3,229th time of being asked, we broke down and added it.
This PDF gives a little detail on the feature, and shows several screen shots (both real product, new HTML pages we put together, as well as some mockups done in Balsamiq) that walks my dev through how the Account statement should look, act, and perform calculations. Since we already had backend code tracking a lot of this, we did not need to go into complex detail for that part, but the Account Statement did have quite a few calculations, and you can see how I marked all of those up inline and explained what each one does.
In a more complex example like this, I would send it to the developer, and ask for feedback and questions, and then do one round of refinement as-needed. I’d also ask them to explain this feature to me – either via mail, or preferably as a topic during one of our regular sync calls.
Download Example 2, Adding a financial Account Statement (PDF)
I hope this provides a good overview of how a tool like Clarify-It can help you quickly create a usable spec for your developer.
In the next article in this series, I’ll take a step back and talk about the initial steps I work through to map out a feature (or product). Stay Tuned.
You can get a 14 Day Free Trial of Clarify-It HERE
Update: Oct 15th – The links to Clarify-It in this article have been updated to affiliate links, which means that SaaS Candy may get a commission on any products purchased through them.
